6 ideas and Crafts to Reuse Colored Crayons
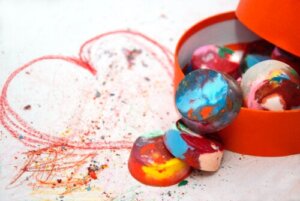
A significant number of people are joining the trend of reusing objects and making crafts and even to reuse colored crayons. Yes, you read that right: with crayon pieces, you can develop some great crafts! It also means less waste for the environment and useful ornaments for the home.
Coating surfaces to give them a beautiful color is one of the main uses for colored crayons, but to do this, you must first melt them. Interested in learning more about this DIY idea? Here are some options to stimulate your creativity after you or your child has had fun painting and there are only pieces left over.
1. Fun figures to reuse colored crayons
This is a project to do with children. The idea is to recycle the crayon ends to melt them together or separately.
Then, get some molds of various shapes and wax paper to use as a stand. At this point, brush the edges of the mold with a little oil, as this will make unmolding easier.
Now you can pour the warm crayon, one by one, to form nice layers of colors. Wait for it to solidify and carefully unmold. You can reuse that figure to make other crafts.

We think you may also enjoy reading this article: Five Ideas to Decorate Your Living Room with Recycled Materials
2. Reuse colored crayons for beautiful candles
They’re useful, beautiful, and fragrant if you add a little of your favorite scent to them. Candles made from crayons are ideal for those who enjoy this type of lighting. So, what do you need? Wicks, a glass container, melted recycled crayons, kerosene, and some essence of your choice.
Heat the separated crayons and mix them with some warm kerosene and a few drops of the essence. Take a piece of wick or wick, just a little longer than the mold, tie a knot at one end and that side is the one that will go into the bottom of the container.
At that point, you can pour the mixture little by little into the mold if you want to see the difference in the colors. Then, just wait a few minutes until the first layer cools before adding another layer.
3. Colorful stained glass by reusing crayons
This is a work of art for your home! You’ll just need a sheet of acetate or filamine, embossing paste, and melted crayons. Draw the shape you want the stained glass to have; you can draw geometric figures or flowers, for example.
Then, border the drawing with embossing paste and proceed to fill it with the wax from the melted crayons. Forn this project, it’s important that you give free rein to your imagination.
4. Creative paintings with melted crayons
This is one of the most popular ideas or crafts with colored crayons. However, keep in mind that although videos on social networks often use new crayons, this time it’s all about reusing.
As it is, you’ve probably seen a woman, a couple, or an elephant with an umbrella using these colored pieces. And while you can certainly replicate the design, also consider that you have a blank canvas to do whatever you want.
In addition to colored crayons and a canvas, you’ll need a hairdryer. This is essential for melting the colors.
5. Bring your glass jars to life!
This is another activity that kids really enjoy. Take several empty compote jars and start personalizing them. They can be used to store other items. Just melt the crayons, make shapes and glue them to the jars.
You could also place the crayons in the jar and melt them with a hairdryer. The best part is watching the crayons take on different shapes.
6. Reuse colored crayons to create original T-shirts
This idea really surprises people! Just grab a bunch of crayons and figure out how to personalize your kids’ T-shirts.
First, gather what you need. This includes crayons, fabric to print, a grater (can be cheese), a piece of cardboard, and a clothes iron.
Once you have everything ready, make the design on the cardboard and cut out the inside. Then, grate the crayons, place the cardboard with the design on the fabric and spread the pieces. To finish, place a piece of fabric on top of the t-shirt you are printing, iron it, and you’re all set!
Like this article? You may also like to read: How to Use Recycled Glass Bottles to Decorate your Garden
Learn how to reuse colored crayons
Crayon pieces are uncomfortable to draw with. So, in addition to the above, it can be a good idea to collect the scraps, place them in a mold, bake, and voila: you have new, easy-to-handle colors for your or your kids!
This text is provided for informational purposes only and does not replace consultation with a professional. If in doubt, consult your specialist.