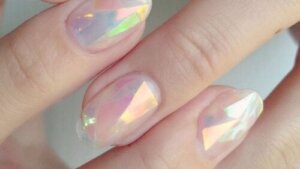
What Are Glass Nails?
The world of nail art has evolved in recent years. To the point that we can find numerous trends and styles. Glass nails is one of the most popular, as it’s rather innovative and attractive.
Here we explain what the technique consists of, the materials used, what the final result would be, and how it’s done. Keep reading to find out!
What are glass nails?
Glass nails is a technique that appeared in 2015.
It originated in South Korea, created by the renowned manicurist Park Eun-Kyung. It involves nails with luminous and three-dimensional effects. The idea is to simulate that you have small pieces of glass on your nails.
What materials are required?
To achieve this effect you need three polishes:
- Base
- Color
- Top coat
These are transparent polishes that work to give a gloss or matte finish. They prevent the manicure from falling off due to bumps, and make it dry faster and last longer.
In addition to that, you’ll need a file, wooden sticks, aluminum foil, Q-tips, and nail adhesives. These adhesives are what are also known as nail art foil. These are metallic papers with different effects.
Other things you’ll need are scissors and tweezers.
How are glass nails made?
If you’re curious to know how to make glass nails, we explain the step by step. In any case, you’ll always get a more reliable result by hiring a specialized stylist.
1. Prepare the nail
Before you start, you must prepare the nail you want to work on. To do this, clean it with water and then shape its edges.
Then, with a cuticle pusher, push it back. Remove that cuticle with a cuticle remover.
Then, gently run the polishing file over the entire nail and wipe off the dust. When finished, apply a coat of acid-free primer.
The cuticle removal step should be done very carefully. The cuticle is the part of the nail that protects it from infection. Moisturize with a special oil and do not cut them.
If you have nail polish on your nail already, you must remove it before you start.
Find out more: Everything You Need to Know About Polygel for Nails
2. Gather the materials
In the previous point, we gave you the materials you’ll need. You can buy the stones in specialized stores or use litmus paper. This is known as foil. When you have everything, you can start.
3. Create the crystals
Cut a piece of litmus cellophane paper. Cut out small triangles of paper, which will adhere to the nail. When you have enough, stack them in a corner of the table to prevent them from getting lost.
4. Paint the nail
The next step is to apply the first coat of clear top coat. Then apply the nail polish of your choice.
To make the crystals shine, a dark background is recommended. It doesn’t need to be black; it can also be a strong, bold color. Let it dry thoroughly and apply the second coat of colored polish.
Find out more: What Does the Dip Powder Manicure Consist Of?
5. Place the crystals
Apply a layer of clear top base coat. Without letting it dry, place the triangles nail by nail with the eyebrow tweezers.
Do it unevenly and without any structure. Fix well with a cotton swab.
6. Seal
When the design is finished, apply a final coat of clear top coat to seal it. This way, your design will last longer and won’t lift.
When is it time for another design?
How long your manicure will last depends on what you have applied. Semi-permanent nails last two weeks, depending on the growth of the nail.
Nails grow slowly. In fact, they do so at a rate of 2.5 millimeters per month, as explained in the book The Nail in Health and Disease. They start growing from the root, which is hidden under the cuticle. This is the portion that joins the skin to the nail and, as we said, protects against infection.
So, when the nail starts to grow, it will appear smooth and the design will run upwards. Then you’ll know it’s time to remove it or make another design.

How to remove the product without damaging the nail?
To remove, file the surface of the nail gently. Then apply some petroleum jelly to the cuticles.
Next, place a cotton disk moistened with acetone around the nail. Wrap each finger with pieces of aluminum foil. Let it act for 15 minutes, during which you’ll feel a slight burning or stinging.
After the time has passed, remove everything and you’ll feel the semi-permanent nail polish soften. Start to remove it, using a cuticle pusher or a wooden stick.
With constant movements, without force and from top to bottom, you’ll ensure you won’t break the nail.
When you remove the biggest pieces of polish, pass a file over it to get rid of the remains. It’s recommended to let your nails rest for two weeks before applying chemicals or exposing them to UV lamps.
Glass nails: an eye-catching option
If you’re looking for a new way to decorate your nails, glass nails could be the solution. They’re easy to do, beautiful, and easy to maintain.
You can wear them on any special occasion. We can assure you that you’ll be the center of attention!
All cited sources were thoroughly reviewed by our team to ensure their quality, reliability, currency, and validity. The bibliography of this article was considered reliable and of academic or scientific accuracy.
- Organización de Consumidores y Usuarios (2019). Esmaltes semipermanentes: no abuses. Disponible en https://www.ocu.org/salud/cuidado-piel/noticias/esmaltes-semipermanentes
- Zaias, N. (2012). The nail in health and disease. Springer Science & Business Media. https://books.google.com/books?hl=es&lr=&id=SwfoCAAAQBAJ&oi=fnd&pg=PA1&dq=nails+physiology&ots=EueFCr2E-M&sig=SIK_wvq-aRfZvNkr7tkYqVqgO4w
This text is provided for informational purposes only and does not replace consultation with a professional. If in doubt, consult your specialist.