One of the most functional adhesives for decorative work, Mod Podge has the ability to seal and polish in the same application. Learn all about it in this article!
If you’ve been wondering how to get those shiny, smooth paper decorations on dishes, frames, or furniture, the answer is Mod Podge. It’s a white adhesive with the ability to glue, seal, and varnish in the same application.
This product has a decorative and protective function when it comes to a variety of materials, including wood, paper, and fabric. In addition, it’s easy to use and contains no toxic elements.
In particular, it’s an indispensable tool for decoupage, a decoration technique based on pieces of paper. Depending on the type of finish you desire and the material you’ll be working on, there’s a wide variety of formulas.
The types of Mod Podge and their effects
The standard or classic type of Mod Podge is the most versatile and you can use it on most of the items we’ve mentioned. It comes in three versions, matte–with a more opaque finish–, glossy –which is similar to regular glue–, and satin–which provides an intermediate or semi-gloss effect.
However, the uses of Mod Podge can be very diverse, both in interior and exterior elements. For more specific materials, such as ceramics or glass, there are special formulas to suit them.
The types of Mod Podge
Paper. Although the classic formula applies to paper, this special Mod Podge was designed for more advanced techniques, such as scrapbooking. It prolongs the shelf life and prevents the leaves from yellowing.
Brushstroke. The main feature of this substance is its textured and dimensional effect that gives an artistic appearance as if it were hand-painted.
Fabric. This substance is ideal to use on fabrics and adhere them to other surfaces. You can apply it to the product before cutting to avoid fraying.
Outdoor. Intended for projects that will remain outdoors. Although it has a greater resistance to humidity, you can apply a specialized sealer at the end for greater durability.
Mega Glitter. This is a dishwasher-safe formula, so it’s suitable for materials such as wood, glass, or ceramic. The final result’s an object with glitter that consists of four different microparticles.
Antique. This acts sort of like a retro filter from social media. It has a brown tint and matte finish that creates a vintage look for objects that you want to give an antique feel.
Hard Coat. This Mod Podge formula has a strong satin finish that causes greater durability. It’s ideal for furniture, as scratches and marks are much less noticeable.
Sparkle. For lovers of the rainbow effect, this formula achieves just that using hologram pieces and a strong shine that increases with each coat.
More useful types of Mod Podge
Dishwasher Safe. This is another model that’s suitable for exteriors and works on glass, metal, or ceramics, and provides a shiny finish. You can wash your products by hand or in the dishwasher, as long as you’ve given them plenty of time to cure. The recommended curing time is 28 days.
Photo Transfer. Created for crafts with photos, both black and white or color. It’s best to do it with a laser photocopy of the original image. It works well when you adhere it to wood or canvas.
Dimensional Magic. Finally, the name for this variety is thanks to its slight three-dimensional effect. It has a resin-like finish, making it ideal for jewelry or paper.
Mod Podge is an indispensable product when it comes to decoupage.
Read also: Four Easy Home Decoration Crafts
How to use Mod Podge for decoupage
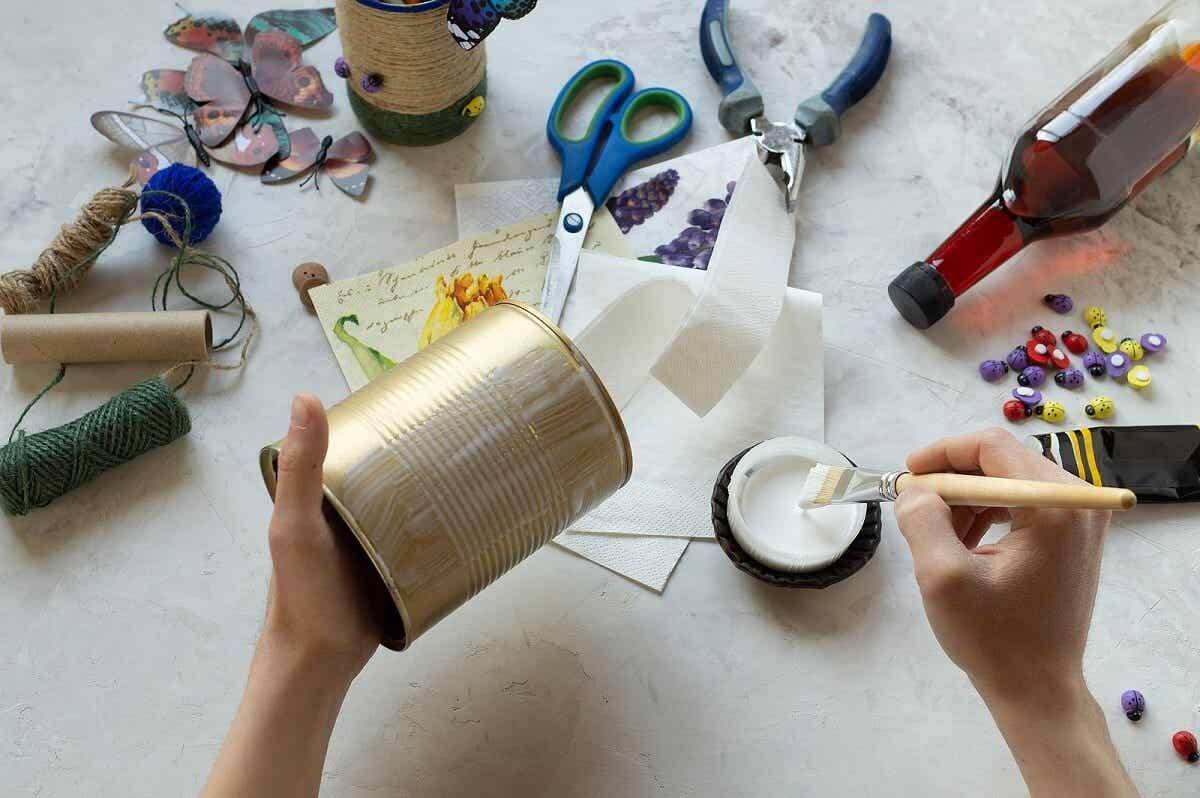
As you may know, decoupage is a technique for decorating objects (usually wood or porcelain) with cut pieces of paper and fabric. Both for gluing and for the final varnishing of these pieces, Mod Podge is the product of choice.
It achieves a hand-painted effect that makes it ideal for use in these projects. For example, some of the objects you can apply decoupage to can be cell phone covers, coasters, breakfast trays, notebook or diary covers, dollhouses, and even plates and dishes.
The materials you’ll need
Some fundamental elements for performing this technique are a project surface, your choice of a Mod Podge formula, paper or fabric for the cutouts, and acrylic paint.
As for tools, brushes with soft, smooth bristles are ideal for evenly distributing the adhesive. Scissors, a pencil, and a ruler are also necessary to mark the drawings on the desired surface.
It’s important to wash the brushes immediately after using them. This way, you can remove the adhesive residue and keeping it from ruining the brushes when it dries. All you need are a common cleaner and non-abrasive soap to get the job done.
5 steps to making decoupage with Mod Podge
1. Choose the surface
Before starting, you must select the base material you want to work with. Some of the most common are wood, paper-mache, tin, cardboard, glass, and some types of plastics. Depending on the option you choose and the look you want, you’ll select the most appropriate Mod Podge formula.
2. Prepare the materials
The next step is the arrangement of your decorative elements. In the case of fabric, you should wash and iron it beforehand. In addition, give it a layer of Mod Podge before cutting. As for the paper, although any type of paper can be used, it’s best to opt for a thicker one.
3. Cut and glue
Once the materials are ready, cut the elements according to the desired size. To adhere them to the surface, you can make pencil drawings, outlining the spaces. Brush on the first layer of Mod Podge, spreading it well so as not to produce bubbles.
4. Place your cut-outs
Gently place your cut-outs on the surface, only when the adhesive is well distributed. Be sure to apply as accurately as possible, as the glue is quick-drying and it’ll make it difficult to move them once they’re already in place.
When placing the glue on the desired surface, keep in mind that it dries quickly. Therefore, precision and agility are required.
5. Apply the top coat
Smooth out the elements with a roller until there are no bubbles or wrinkles. Then, after 20 minutes of drying, apply the top coat of Mod Podge to achieve the characteristic varnish and gloss. Two or three coats are enough, always leaving time in between to dry.
Be sure to read: Tips on How to Paint Wooden Furniture
Final tips
Finally, to achieve better adhesion, remember to place glue on both contact sides of the project surface.
Although Mod Podge is water-resistant, it’s not a completely waterproof product. If submerged, it can be ruined. Therefore, you must dry it quickly, including formulas intended for outdoors and contact with liquid.
All cited sources were thoroughly reviewed by our team to ensure their quality, reliability, currency, and validity. The bibliography of this article was considered reliable and of academic or scientific accuracy.
Aguilar, Jaqueline et al. “Evaluación de La Fuerza de Adhesión de Pegamentos Para Papel.” Revista de Iniciación Científica 5.1 (2019): 17–20. Revista de Iniciación Científica. Web. https://doi.org/10.33412/rev-ric.v5.1.2224